Easily move your native app to Flutter
“But I already have an Android and iOS app, why would I need Flutter?”
After you read this blog post, the answer will become obvious - to save time and money.
“I understand the advantages of Flutter, but can't afford to throw away my current apps and restart in Flutter.”
You won't need to! In this blog post, we will show you how new additions to your existing code can be written in Flutter.
Switching to Flutter, a business case
There are a few cases to consider:
- You are completely redesigning both iOS and Android apps.
- You are completely redesigning one app.
- You are adding a new feature to one or both apps.
Let us consider the first case. You have both an Android and iOS app and it is time for a major update or a complete redesign. This is an ideal time to incorporate Flutter. Using this cross-platform development tool, you can cut your development resources in half, since you only need one development and QA team, instead of two. This can free up your second resource team for other projects. Additionally, development resources are generally about 10% more efficient than using a native language development platform. This amounts to a 55% savings in resources over using the traditional native language approach. Runtime performance and code size are on par with native language apps. The only downside is the requirement to learn a new programming language, Dart. It is easy to learn but nonetheless could somewhat cut into your 55% resource savings for your first Flutter endeavor. It is best to plan on 50% resource savings for the first development cycle.
In the second case, you have an app for both Android and iOS and you need to redesign one of the apps. Should you consider Flutter, or should you use a Native app language, like Swift or Kotlin? Even if you only built a single app, Flutter is still an excellent choice. If your newly developed app uses Flutter, you will have more options for the future. You may elect to replace your existing app immediately, or wait until the next refresh. In the next refresh, your development time will be near zero. The look and feel of both apps will also match. From that point forward, all development and maintenance has the advantages of a true cross-platform.
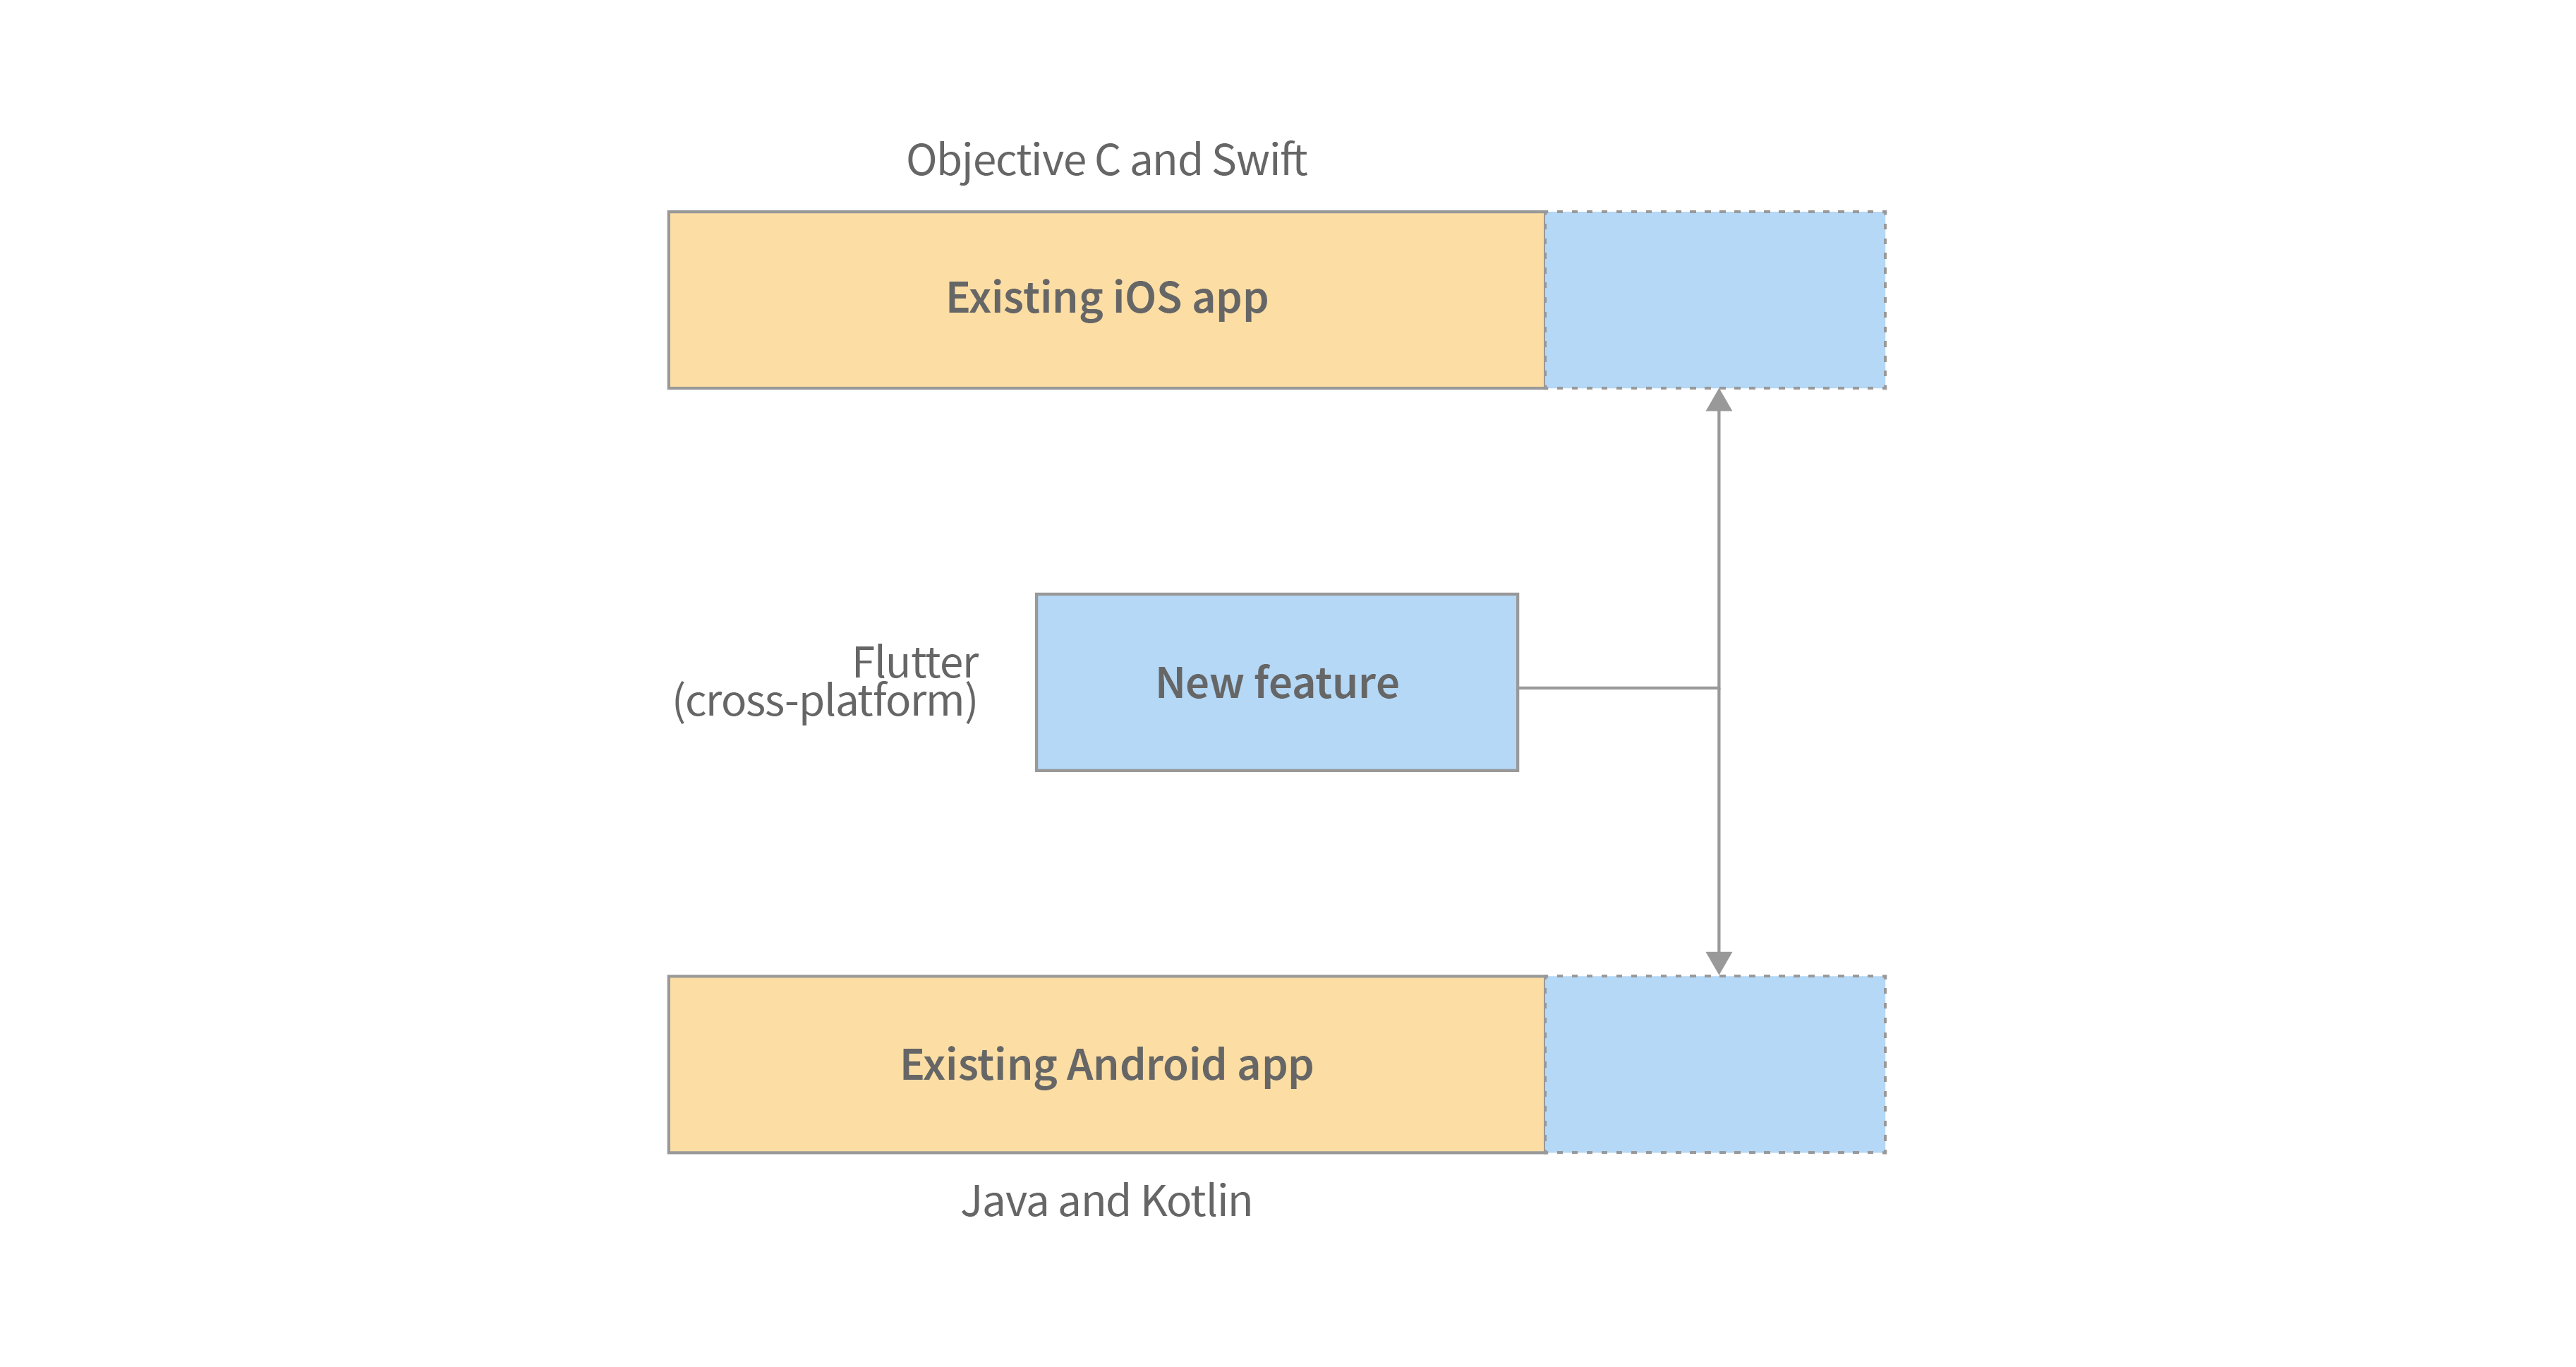
The last case is not as obvious. You have two apps written in their native languages, which don't need replacements or major upgrades yet - you just want to add a feature. Well, Flutter should still be your choice. You can use all of your existing native-language code, while writing your new features in Flutter. In the remainder of this whitepaper, we will present a technical case study where we did just that.
Flutter as an incremental approach - a case study
One of our clients came to us with a request we see often - to add a customer satisfaction survey into an app that had a long history. This would require adding a whole new user flow into both the iOS and Android versions of the application.
The iOS and Android apps had massive code bases with mixed technology stacks. They initially started out using Objective-C and Java, but the majority of the more recent code was written with Swift and Kotlin. The new features would need to be tested carefully, and the updated version would need to be delivered to users in a very short timeframe.

The task to add a survey appears to be pretty straightforward. All it essentially requires is to add a new item in the main menu that leads the user to a set of new screens containing blocks of questions, and a large “Submit” button. It will also need to contain a screen that rewards the user for taking the survey.
Traditionally, we would require assigning two developers (one for iOS and one for Android), as well as a QA engineer to cover both platforms with tests. With Flutter, only a single development team is required, and there is no need to throw away the legacy Android and iOS code. It is possible to create a new module, and implant it into existing applications without much effort.
Why Flutter?
In a Grid Dynamics blog post about Flutter, it has some very cool advantages over taking a more traditional native approach. Its speed and performance is similar, but it has a true cross-platform nature. This means that code has to be written only once to be used across multiple platforms, including the Web. It also has the benefit that it needs to be tested once, as it supports modern testing frameworks.


After some preliminary investigation work and a long discussion of potential pros and cons with the client, our team decided to take on the challenge of trying to implement the desired survey feature using Flutter.
Now let’s dive a little deeper into the technical details.
Integrating the Flutter module
First of all, we need to add Flutter into the current apps. There are two ways this can be achieved. The most obvious route is to create a new Flutter app with the flutter create command, and then replace the generated runner projects with the current ones. However, this is a much more difficult method because we may have to do many tweaks to the current projects, and if we miss something, everything will be ruined. It also forces you to relocate your current projects inside a Flutter project folder, which is almost always an unacceptable option.
Fortunately, Flutter gives us another way. We can create a dedicated module with the flutter create -t module command. It creates a new project, but uses a slightly different structure. The main advantage over the previous solution is the opportunity to have a Flutter module separated from the main code as it's added as an external dependency. This process is described in detail on the official documentation page, and only takes 10 minutes to connect and run the Flutter module from an existing app.
Now that the issue has been addressed, we can move onto discussing the next tricky thing: communication between the native code and Flutter module.
Developing a new feature
It is now time to introduce our new feature to the app - of course, we can’t share the actual design of the app, as our client doesn’t want it publicly exposed just yet. Instead, we will just use a recreated demo-app to illustrate the main concepts.
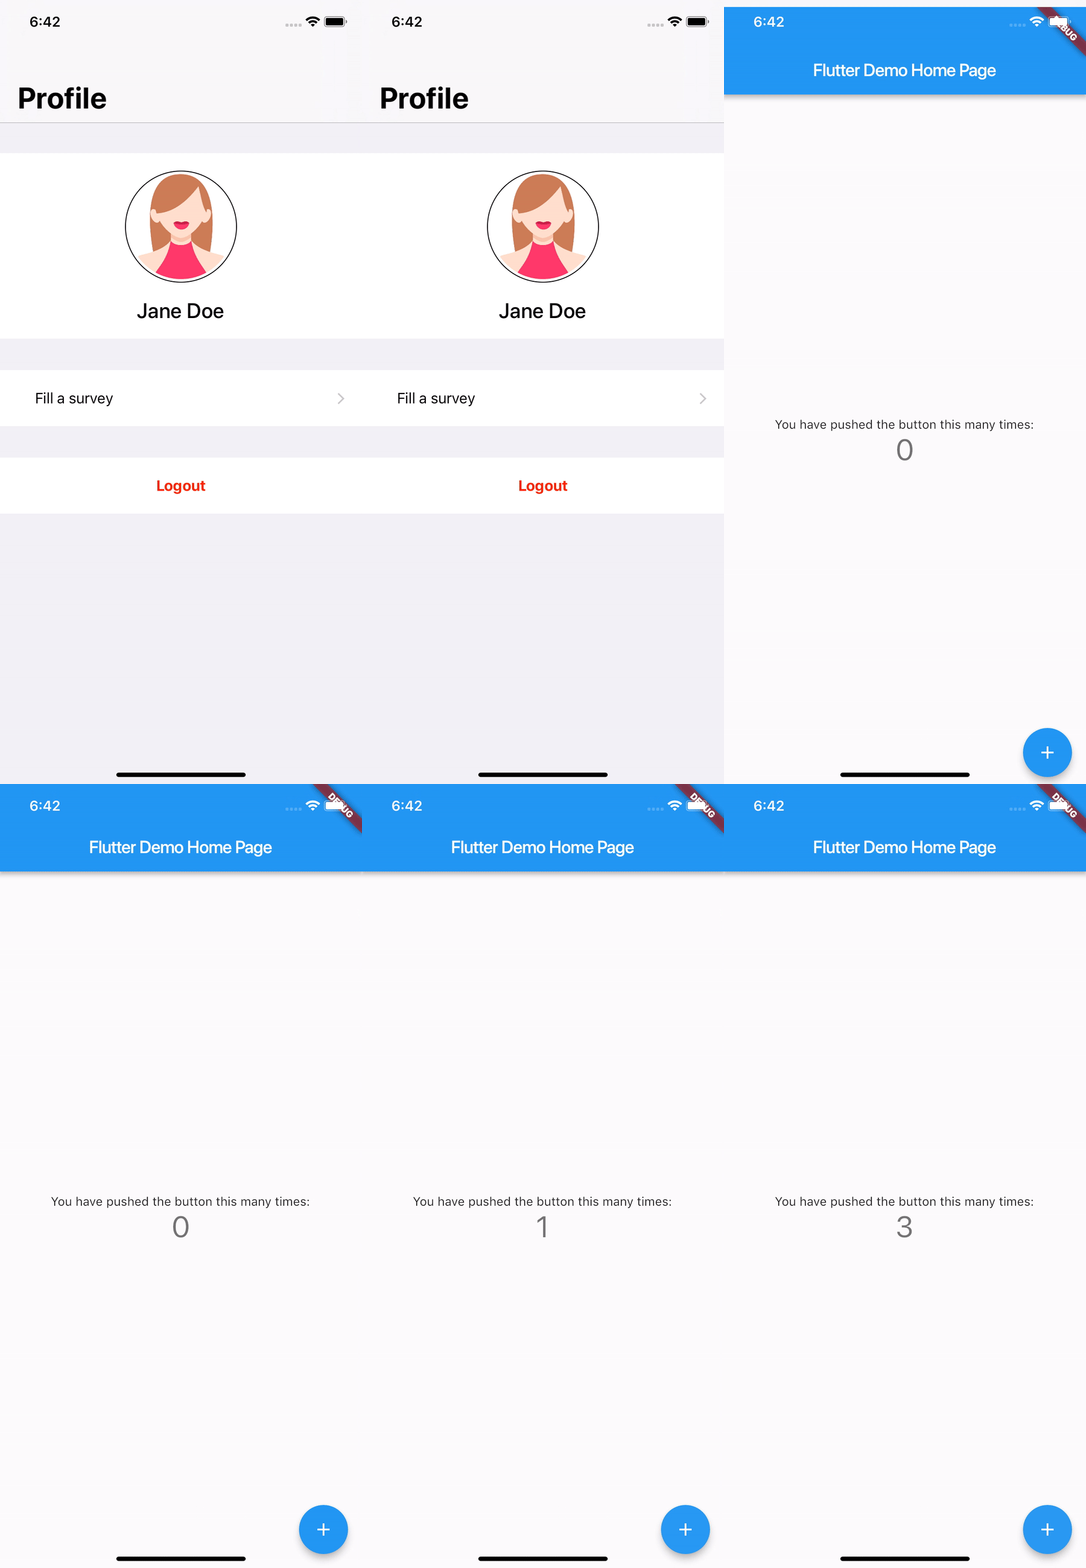
Here we have an app and a User Profile screen from where the user could run a survey:

The code of this screen is quite lengthy, but it is fairly obvious for anybody who is familiar with iOS development. We will just show the code for the function that is responsible for the “complete a survey” action:
func makeAction(at index: Int) {
   guard
      let delegate = UIApplication.shared.delegate as? AppDelegate,
      let engine = delegate.flutterEngine,
      let controller = FlutWowterViewController(engine: engine, nibName: nil, bundle: nil)
   else { return }

   present(controller, animated: true)
}
Note that currently there’s no possibility to close the Flutter screen – the module knows nothing about a host app. This means that we need to build a communication channel between the native code and Flutter module. But before we dive into that, let’s go through a little bit of theory first.
Building communication channels
For now, the most convenient way to pass data between the platform code and Flutter module is to use Platform Channels. On a very basic level, it works in the same way as networking ports: two sides connect via a named channel, and send binary messages to each other.
Currently, Flutter offers two usable types of channels outside of basic binary: Message Channel, and Method Channel. The Message Channel is very convenient to pass data between Flutter and the native code, while the Method Channel is useful for calling functions.

But for now, the only way to pass data is to serialize it into a JSON string, as there is no binary compatibility between the frameworks. And the same goes for Method Channels – you need to specify the desired function name with a string, and then check it via pattern matching, which is extremely error-prone.
We will need to use the platform channels in two ways. First, we want to pass some data from the native app to the Flutter module. In the case of our survey, it would be nice to be able to address the user by name. Second, we are not going to create another networking layer on the Flutter side, as we already have it in native code. So our module will send the survey results via the current API layer instead.
Opening a channel
Let’s return to our app. We need to add the ability to close a survey on demand. But before that, it would be helpful to create method channels on all sides.
On the iOS side, we would need to add the next lines right before presenting a controller with the Flutter module:
let channel = FlutterMethodChannel(name: "survey_channel", binaryMessenger: controller)
channel.invokeMethod("prepare", arguments: user.fullName)
channel.setMethodCallHandler { [weak self] call, result in
    switch call.method {
    case "close":
        self?.dismiss(animated: true, completion: nil)
        result(nil)
    default:
        result(FlutterMethodNotImplemented)
    }
}
If you’re wondering what is happening here, we’re opening a named method channel with our FlutterViewController object as a binaryMessenger. Note that it’s required for all sides of communication to use exactly the same channel name. Right after opening a channel, we need to pass a user’s full name to the Flutter module via prepare method, and then set up a handler for Flutter-module side invocations. Pretty simple.
On the Flutter side, there’s a little more work, though almost all of that is covered by the code of the module:
class _SurveyPageState extends State<SurveyPage> {
  bool showCloseAction = false;
  String fullname = '';

  static const apiChannel = const MethodChannel('survey_channel');

  @override
  void initState() {
    apiChannel.setMethodCallHandler(_handleMethod);

    super.initState();
  }

  void close() {
    apiChannel.invokeMethod('close');
  }

  Future<dynamic> handleMethod(MethodCall call) async {
    switch(call.method) {
      case 'prepare':
        setState(() {
          fullname = (call.arguments as String) ?? '';
          showCloseAction = true;
        });
        return Future.value();
    }
  }

  @override
  Widget build(BuildContext context) {
    return Scaffold(
      appBar: AppBar(
        title: Text(widget.title),
        leading: showCloseAction ? IconButton(icon: Icon(Icons.close), onPressed: close,) : null,
      ),
      body: ... // this part is not changed yet
    );
  }
}
Making a survey list
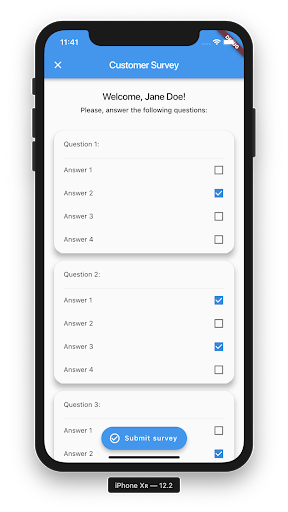
The next step is to make an actual survey list with Flutter. It’s quite straightforward, mainly involving tossing widgets around. Here’s the final result:

To send collected answers to the backend, we're going to use a native call rather then Dart to accomplish this. We need to serialize our data from Map<int, List<int>> in the Flutter module to a JSON string. This can then be sent as an argument of a call in an already opened method channel to the native app to then transfer further to the backend.
On the iOS side, we need to add a handler for a new method:
case "sendSurvey":
   guard let survey = call.arguments as? [Int: [Int]] else { return result(false) }
   print("sending survey: \(survey)")
   DispatchQueue.main.asyncAfter(deadline: .now() + 0.5) {
      result(true)
   }
As its demo code, we just send a successful result back to a caller after a short delay. In the real app, it should be an API call with asynchronous callback.
On the Flutter side, the most interesting part is the handler for the submit button:
_submitAnswers(BuildContext context) async {
    setState(() => isLoading = true);
    final bool success = await apiChannel.invokeMethod('sendSurvey', survey);
    if (success) {
      Navigator.of(context).push(MaterialPageRoute(builder: (_) => RewardPage(apiChannel: apiChannel,)));
    } else {
      showDialog(...);
    }
    setState(() => isLoading = false);
  }
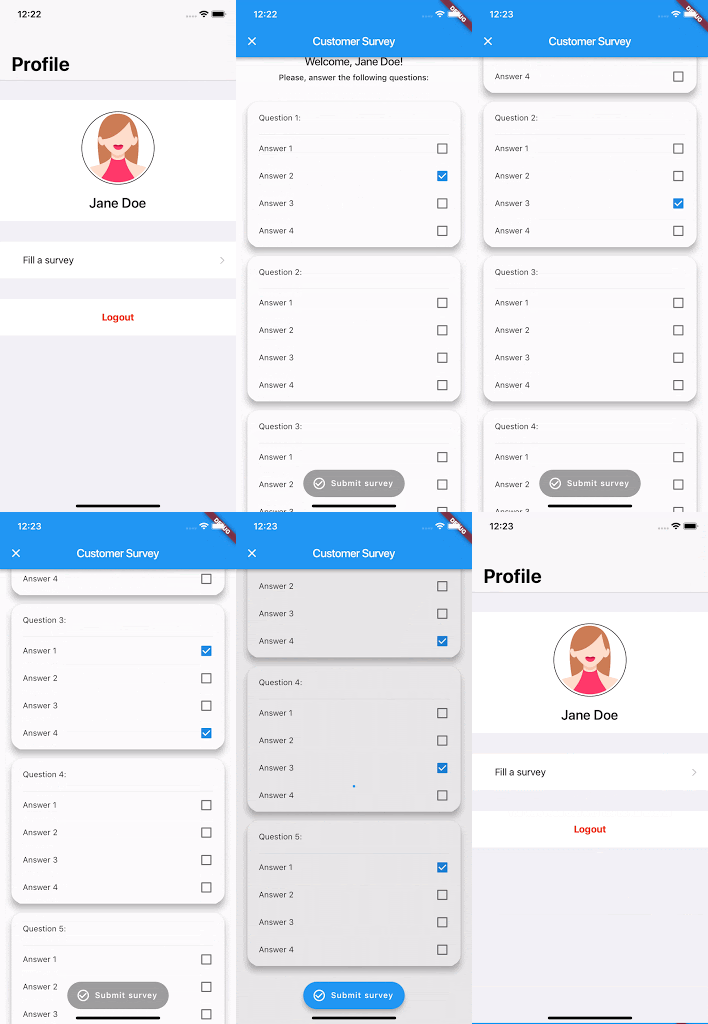
Let’s explain this code in a little bit more detail. First, we want to show the activity indicator, which is what the isLoading variable is for. Then, we invoke a method via the platform channel and wait for the results. Note the simplicity and elegance of asynchronous calls handling in Dart, especially compared to Swift’s GCD. The final step is to check an invocation result to show either the reward page or an error alert. Take a look at how cool it is:

Conclusion
We have simplified things for the sake of clarity. For example, our demo app could be further expanded so iOS and Android designs always match, as they would in production code.
Feature delivery time is dependent on the specific task, but in general development speed is cut roughly in half using the Flutter cross-platform development tool.Flutter also solves many common UI development issues, and its hot reload feature dramatically reduces development time.
Whether you are developing an entirely new app for one or both mobile platforms, or simply adding a new feature to existing native apps, Flutter is the ideal platform for your project. If you need further details or assistance, a Grid Dynamics Representative will gladly walk you through it.

